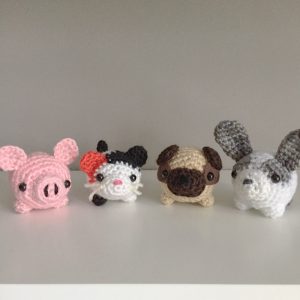
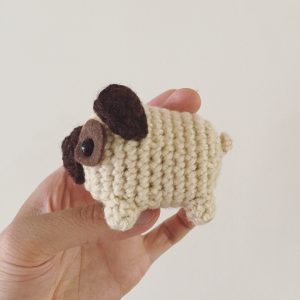
I love the shape of pugs. That little loaf body and itty bitty legs is just too much!
I set out to develop a simple and quick pug amigurumi pattern that epitomizes that adorable loaf shape. But I soon realized that all animals are cuter in loaf form. By changing up the yarn colour, and a few changes here and there, you can loaf-mode any creature.

Below I have the instructions for the loaf pug. However, I would LOVE to see your creative loaf pets made from this pattern. Comment below or share your loaf animal on Instagram (remember to tag @sirpurlgrey)! I can’t wait to see what you come up with!
Materials:
Yarns – Main colour (A), Ear colour (B), small amount of black for the nose
8 mm safety eyes
polyester fibrefill
size 7 (4.5 mm) crochet hook
yarn needle
brown felt (cut two small circle shapes)
Abbreviations:
ch = chain
st = stitch
sc = single crochet
hdc = half double crochet
inc = single crochet 2 into the same stitch
dec = decrease over next two stitches (single crochet 2 stitches together or use invisible decrease)
sl st = slip stitch
DOG EARS (Make 2)
R1: With B, sc 6 in magic ring (6)
R2: sc 1, inc, [sc 1, hdc 1] in next st, [hdc 1, sc 1] in next st, inc, sc 1 (10)
Finish with a sl st. Cut a long tail for sewing.
MUZZLE
R1: With A, sc 6 in magic ring (6)
R2: sc 1, [sc 3] in next st, sc 2, [sc 3] in next st, sc 1 (10)
R3: sc 3, [hdc 2] in next st, [hdc 1, sc 1] in next st, sc 2, [sc 1, hdc 1] in next st, [hdc 2] in next st, sc 3 (16)
Finish with a sl st. Cut a long tail for sewing. Using a small amount of black yarn, embroider a nose in the middle of the piece.
HEAD/BODY BASE
R1: With A, sc 6 into magic ring (6)
R2: inc in each st around (12)
R3: (sc 1, inc) six times (18)
R4: (sc 2, inc) six times (24)
R5: (sc 3, inc) six times (30)
R6-10: sc in each st around (30)
R11: (sc 3, dec) three times, (dec, sc 3) three times (24)
R12-15: sc in each st around (24)
At this point, you can add the facial details before closing up the body. Sew the MUZZLE in the center. Insert the safety eyes through the brown felt pieces and then to both sides of the MUZZLE.
R16: (sc 2, dec) six times (18)
R17: (sc 1, dec) six times (12)
R18: dec six times (6)
Finish with a sl st. Cut a short tail and weave in to close up the body.
FEET (Make 4)
R1: With A, sc 6 in magic ring (6)
R2: (sc 1, inc) three times (9)
Finish with a sl st. Cut a long tail for sewing.
TAIL
With A, chain 4.
R1: Skip first ch from hook, sc 1, hdc 2
Finish with a sl st. Cut a long tail for sewing.
ASSEMBLY


Sew EARS to BODY.
Sew FEET to BODY.
Sew TAIL to BODY.


OMG! I love this so much! I’ve been looking everywhere for a really cute pug design. If it comes to that, would you mind if I sold the ones I make if I give you credit for it? OMG, just sooo cute!!! <333
Please go right ahead if you wish to sell them! Thank you for trying out my pattern!
I love this pattern so much! I’m making it for my mom who just had to put down our pug. I hope this will make her feel a bit better, thank you for coming up with a wonderful pattern
So sorry to hear about your mom’s dog 🙁 I hope your pug does a lot to lifts her spirits!
Thanks a bunch!!! XD
Could you make a panda, baby whale, parrot, and pineapple in the same style? Please and thank you for the awesome pug one! It was incredibly easy to follow!
I love this- so cute!! Thank you so much for sharing it. I can’t wait to make it. It looks like the best pug pattern I have seen so far.