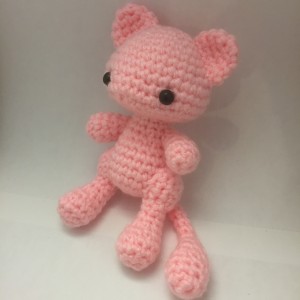
The original Pokemon Red and Blue games are being released on Nintendo’s 3DS eShop later this month to celebrate Pokemon’s 20 year anniversary.
I can’t believe it’s been that long since I played Blue for the first time, picking my new Squirtle buddy, lovingly named Franklin, and setting foot on my Pokemon adventure.
I remember the days when Pokemon rumours ran rampant on the playground and I was a dumb, gullible kid thinking that it was possible to find and capture a Mew by trying to move the truck by the SS Anne.
Here, we’ll capture the 151st Pokemon in our own way. You won’t need a Master Ball here. Exchange it for a ball of pink yarn and ready your trusty crochet hook.

Mew Crochet Pattern
Materials:
- pink worsted weight yarn (I used Bernat Super Value Baby Pink)
- 8 mm safety eyes
- polyester fibrefill
- size 7 (4.5 mm) crochet hook
- yarn needle
Abbreviations:
- ch = chain
- st = stitch
- sc = single crochet
- inc = single crochet 2 into the same stitch
- dec = decrease over next two stitches (single crochet 2 stitches together or use invisible decrease)
HEAD
R1: sc 6 into magic ring (6)
R2: inc in each st around (12)
R3: [sc 1, inc] around (18)
R4: [sc 2, inc] around (24)
R5: [sc 3, inc] around (30)
R6-7: sc in each st around (30)
R8: sc 8, inc, inc, sc 10, inc, inc, sc 8 (34)
R9: sc in each st around (34)
R10: sc 15, inc, sc 2, inc, sc 15 (36)
R11: sc in each st around (36)
R12: [sc 4, dec] three times, [dec, sc 4] three times (30)
R13: [sc 3, dec] three times, [dec, sc 3] three times (24)
R14: [sc 2, dec] around (18)
R15: [sc 1, dec] around (12)
Finish with a sl st. Leave 12″ tail for sewing.
EARS (Make 2)
R1: sc 6 into magic ring (6)
R2: [sc 1, inc] around (9)
R3: [sc 2, inc] around (12)
R4: sc in each st around (12)
Finish with a sl st. Leave 8″ tail for sewing.
BODY
R1: sc 6 into magic ring (6)
R2: inc in each st around (12)
R3: [sc 1, inc] around (18)
R4-7: sc in each st around (18)
R8: sc 6, dec, sc 2, dec, sc 6 (16)
R9: [sc 2, dec] around (12)
R10: sc in each st around (12)
Finish with a sl st. Leave a short tail and weave in.
ARMS (Make 2)
R1: sc 6 into magic ring (6)
R2: [sc 1, inc] around (9)
R3-4: sc in each st around (9)
R5: dec, sc 7 (8)
R6: [sc 2, dec] around (6)
Finish with a sl st. Leave 8″ tail for sewing.
THIGH (Make 2)
R1: ch 4, skip first ch from hook, inc, sc 2, turn work to continue on other side of chain, sc 2, inc (8)
R2: sc 1, inc, sc 4, inc, sc 1 (10)
R3: sc in each st around (10)
Finish with a sl st. Leave 8″ tail for sewing.
FEET (Make 2)
R1: sc 6 into magic ring (6)
R2: sc 1, inc, inc, inc, inc, sc 1 (10)
R3: sc 1, [inc, sc 1] four times, sc 1 (14)
R4: sc 5, dec, dec, sc 5 (12)
R5: sc 3, dec, sc 2, dec, sc 3 (10)
R6: [sc 3, dec] around (8)
R7: sc in each st around (8)
Finish with a sl st. Leave 8″ tail for sewing.
TAIL
R1: sc 6 into magic ring (6)
R2: [sc 1, inc] around (9)
R3: [sc 2, inc] around (12)
R4: sc in each st around (12)
R5: [sc 4, dec] around (10)
R6: [sc 3, dec] around (8)
R7: [sc 2, dec] around (6)
R8: dec, sc 4 (5)
R9-17: sc in each st around (5)
Finish with a sl st. Leave 8″ tail for sewing.
ASSEMBLY
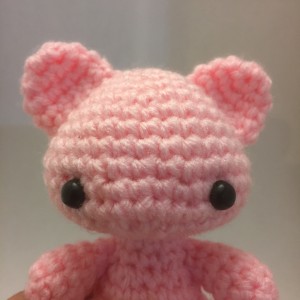
Insert the safety eyes about 6 stitches apart in a position 10 rows from the top of the head. Stuff the head with polyfill to desired firmness.
Sew the ears to the head as pictured.

Stuff the body. Use the tail from the head to sew the body to the head.
Sew the arms onto the body.
Sew the thighs onto the body.
Sew the feet onto the body.
Sew the tail onto the body.
Gotcha! Mew was caught! And no cheat codes or convoluted game glitches required!
Please comment below if you have any questions or post links to your finished projects!
This pattern was written by Phillip Ha of Sir Purl Grey. As long as I am credited for the design, products made from this pattern may be sold. I encourage you to share this pattern but please do not claim it as your own and do not sell the pattern or distribute it for profit.


Aww! Adorable! Thanks for sharing the pattern for free!
Hi,
thank you so much for this super cute pattern!
I guess you’ve got a typo in round 7/8 of the tail-part.
It says round 7 twice. Guess that’s just mew, trying to confuse us all!
Nadine
Thanks so much for catching the typo!
I look forward to seeing your finished Mew!
did the typo was edited to be the correct one?
Hi, I did your amigurumi mew, and the results was so cool. Thank you so much for sharing this free pattern with all of us
I’ve been struggling with crocheting new so much with other patterns, but this was so clear, and the results are perfect. Thank you thank you thank you!!!!!!!
Are you done with the book? How can we order one outside of the Canada My mew doesn’t look as good as yours! “_”
About how tall and wide is the finished mew?
Not including the feet or arms
It depends on how tight or loose you crochet. I’m a tight crocheter so my mine ends up around 5 inches tall.
Adorable, me encanta !!
Hola me llamo Felisa y me encantan tus Pikemon , soy Española y vivo en Barcelona y solo hablo Español , lastima porque quería sacar el Pikemon que le gusta a mi nieto y no lo he podido hacer no lo haces en Español, gracias
I can’t wait to get started on my own! I might even make a pokeball capsule for it!
Mewtwo? Please?
Can’t wait to do mew I don’t have pink so I’m going to make the shiny light blue version. Thanks soo much for sharing for free!!!!! Mew is one of my favorites!!!!!😄🙂😀
The 4.5 took was too big so I used a 3.5 took and it turned out just like yours!!!!!!😄
I’m so glad that you enjoyed the pattern!
I am not sure how to assembly the feet. It would be really nice if you could explain more that part. From what I understand the opened part of the thigh goes on the body and the foot it attached to the round closed part of the thigh. O_o
The thigh is sewn onto the body first. Then you’ll sew the open end of the foot/leg to the bottom of the thigh. Hope that helps!
Hi there! I’m having trouble making the thighs. Are they just flat pieces or do you join the 4 initial chains in a circle?
R1 is worked like it is a row but once you get to the end of the row, you turn it counter-clockwise so that you can work the other side of the row. R2 now works as a round. Hope that helps!
Thank you so much for sharing, my bf loves Mew. I’m so gonna make this for him 😀 thank you again, great work!
Thank you so much for this pattern! It will be my friend’s birthday gift =D You are helping people from Brazil! hahaha
Great pattern! The only part I couldn’t understand was the tights. I tried several times but got lost. Could you explain it a bit better, please? Thank you!
There are two sides to a chain. After you inc, sc 2 on one side of the chain, you turn the work so that you can sc 2, inc into the other side of the chain. Then you will be working in a round for R2.