It’s getting close to Easter season! I always get egg-stremely egg-cited for the egg-scuse to egg-sersise egg-ceptionally egg-stravagant egg puns! Go ahead, egg me on!
Okay, no more yolks. 🙂
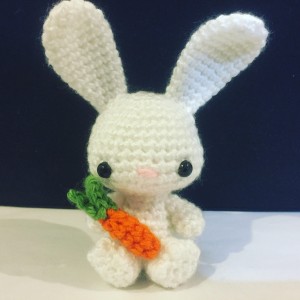
To celebrate Easter, amigurumi-style, you can crochet up this little guy with my free Easter Bunny pattern.
Hoppy Easter! I hope you have an egg-cellent holiday!
Materials:
- worsted weight yarn of any color for the main body (I used Bernat Super Value)
- orange and green yarn for the carrot
- pink worsted weight yarn for the nose
- 8 mm safety eyes
- polyester fibrefill
- size 7 (4.5 mm) crochet hook
- yarn needle
Abbreviations:
- ch = chain
- st = stitch
- sl st = slip stitch
- sc = single crochet
- inc = single crochet 2 into the same stitch
- dec = decrease over next two stitches (single crochet 2 stitches together or use invisible decrease)
- puff st = [yarn over, insert hook into st, yarn over, pull yarn through st, yarn over, draw through 2 loops] twice into the same st, yarn over, pull yarn through all three loops on hook
HEAD
R1: sc 6 into magic ring (6)
R2: inc in each st around (12)
R3: [sc 1, inc] around (18)
R4: [sc 2, inc] around (24)
R5: [sc 3, inc] around (30)
R6-7: sc in each st around (30)
R8: sc 8, inc, inc, sc 10, inc, inc, sc 8 (34)
R9: sc in each st around (34)
R10: sc 15, inc, sc 2, inc, sc 15 (36)
R11: sc in each st around (36)
R12: [sc 4, dec] three times, [dec, sc 4] three times (30)
R13: [sc 3, dec] three times, [dec, sc 3] three times (24)
R14: [sc 2, dec] around (18)
R15: [sc 1, dec] around (12)
Finish with a sl st. Leave 12″ tail for sewing.
EARS (Make 2)
R1: sc 6 into magic ring (6)
R2: inc in each st around (12)
R3: [sc 5, inc] around (14)
R4-6: sc in each st around (14)
R7: [sc 5, dec] around (12)
R8-9: sc in each st around (12)
R10: [sc 4, dec] around (10)
R11: sc in each st around (10)
R12: [sc 3, dec] around (8)
Finish with a sl st. Leave 8″ tail for sewing.
BODY
R1: sc 6 into magic ring (6)
R2: inc in each st around (12)
R3: [sc 1, inc] around (18)
R4: [sc 2, inc] around (24)
R5-6: sc in each st around (24)
R7: [sc 4, dec] around (20)
R8: [sc 8, dec] around (18)
R9: sc in each st around (18)
R10: [sc 7, dec] around (16)
R11: [sc 2, dec] around (12)
Finish with a sl st. Leave a short tail and weave in.
ARMS (Make 2)
R1: sc 6 into magic ring (6)
R2: [sc 1, inc] around (9)
R3: sc in each st around (9)
R4: dec, sc 7 (8)
R5: sc in each st around (8)
R6: [sc 2, dec] around (6)
Finish with a sl st. Leave 8″ tail for sewing.
FEET (Make 2)
R1: sc 6 into magic ring (6)
R2: inc in each st around (12)
R3: sc 3, [puff st, sl st] three times, sc 3 (12)
R4: sc in each st around (12)
R5: [sc 4, dec] around (10)
Finish with a sl st. Leave 8″ tail for sewing.
TAIL
R1: sc 6 into magic ring (6)
R2: inc in each around (12)
R3: sc in each around (12)
R4: [sc 1, dec] around (8)
Finish with a sl st. Leave 6″ tail for sewing.
CARROT
R1: With orange, sc 6 into magic ring (6)
R2-4: sc in each around (6)
Finish with a sl st. Cut a short tail and weave in.
With green, chain 5.
Skip first ch, sc 4, ch 6 and turn.
Skip first ch, sc 5, ch 6 and turn.
Skip first ch, sc 5.
Fasten off. Cut a long tail and sew to the end of the carrot.
ASSEMBLY
Insert the safety eyes about 6 stitches apart in a position 10 rows from the top of the head. Stuff the head with polyfill to desired firmness.
Sew the ears to the head. Embroider nose in between the eyes. Stuff the body. Use the tail from the head to sew the body to the head.
Sew the arms onto the body.
Sew the feet onto the body.
Sew the tail onto the body.
Congrats! Your bunny is complete!
Please comment below if you have any questions or post links to your finished projects!
This pattern was written by Phillip Ha of Sir Purl Grey. As long as I am credited for the design, products made from this pattern may be sold. I encourage you to share this pattern but please do not claim it as your own and do not sell the pattern or distribute it for profit.

Super Cute, thanks for sharing 🙂
The pattern works up perfectly! Two things I especially appreciated: 1) that you were specific about the placement of the eyes – it just made the whole face thing *so* much easier, and is a huge part of why my bunny turned out looking every bit as adorable as yours, and 2) that you left the 12-stitch openings at the bottom of the head and the top of the body – super easy to join, and no wobbliness in the neck like happens with other ami patterns I’ve tried. My granddaughter is going to love this Easter present, and I will definitely check out your other patterns!
Thanks so much for the feedback Jeannine! Have a great Easter and I hope your granddaughter loves the bunny!
Where is the pattern part for the carrot in its hands? I love the pattern for the bunny but I can’t find the carrot pattern. Please help. Thank you!
Hi Janis,
The pattern has now been updated with the carrot instructions!
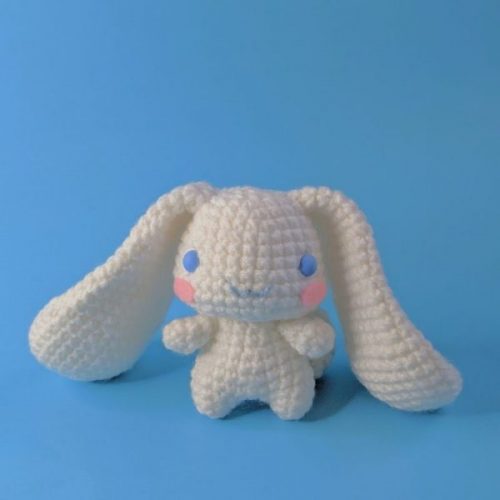
I… My ears are just round? How? What am I missing? Help please, this is so cute, I wanna make it!
Maybe try crocheting a little tighter?
I love this pattern so much! When I was not even done my friend already liked it, thank you for sharing this pattern. The only thing is that sometimes it was hard to see a few things because there is only one picture, so if I had to name something that I would like to have is more pictures of this super cute bunny on this website.
Having the same issue…im not new to crocheting and these look NOTHING like ears. They are legit short and completely round pieces that I swear are legs. I feel like the pattern must have been messed up when it was updated to include the carrot which is a bummer because now every piece I’ve made for this was a waste
I’m not sure what you mean by the ears being round and short. They are 12 rounds in height whereas the feet are only 5 rounds in height. After the ears are crocheted, they’re flattened and not stuffed. There is no issue with the pattern as many have successfully made it.
Hi how tall is this little bunny when finished? I can never tell from the patterns
He’s so cute.
Thanks,
It depends on the person and tension. I’m a tight crocheter so mine ended up being about 5 inches tall but I’ve seen one that’s as big as 10 inches with the same pattern.
Thank you for all your awesome patterns! Commenting that this seems to work pretty well with size 10 crochet thread as well. Pic: https://imgur.com/a/sAo1jmZ
I love this so much! Thanks for sharing your photo!
Hi! just wondering if you can show a pic of the back of the bunny. I would like to see how the tail looks when attached. Thank you!
Hi Meghan,
This is a slight different bunny but you can see the tail sewn near the bottom of the body in this picture:
https://imgur.com/t5mM4SE
Thank you so much for this pattern, I made a small adaptation to the tail and made it a pom pom, but Luke Skyhopper looks pretty awesome!! https://www.instagram.com/p/CDPpNvsHlbt/?utm_source=ig_web_copy_link
I can’t seem to get the instructions for the feet.
R3: sc 3, [puff st, sl] three times, sc 3 (12)
Wouldn’t this equal 9 stitches?
I follow the previous puff stitch directions but doesn’t make sense to me. can you help?
Otherwise love this little bunny!
Hi MaryAnne,
The [puff st, sl] is two stitches so doing it three times should be a total of 6 stitches.
You only say to stuff the head and body, are we supposed to also stuff the arms, legs, tail and carrot?
From the comments I saw that we do not stuff the ears.
You can lightly stuff the arms, legs, tail and carrot. They’re small pieces so they wouldn’t need a lot of stuffing.
Hi thank you so much for your pattern. I wanted to make this slightly bigger is this possible?
I tried doing sc 7, Inc for a total of 48 stitches but then I’m off on your count for row 8 of the head. Could you please help?
Thank you for this!! I am already on my second one. I don’t consider myself a fast crocheter, but these are crocheting up quickly.