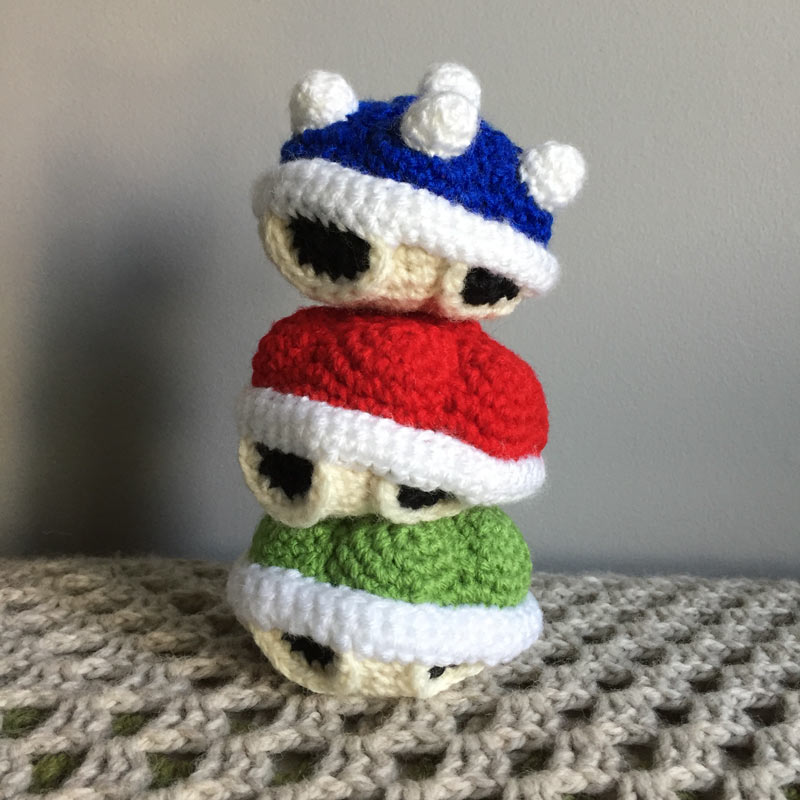
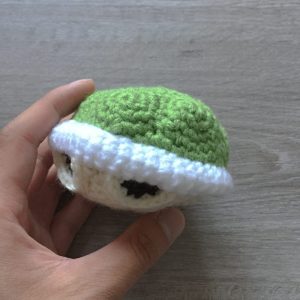
I have been playing a LOT of Mario Kart 8 Deluxe and I’m finding that I often have to keep my road rage in check. To do that, I developed this pattern for the Koopa shells that you can use as items in the game to launch at your opponents. But now you can make your own and launch them at your real-life rivals!
Before releasing the pattern, several crocheters offered to test it and offer tips and tricks for making the Koopa shell. Many thanks to Gretchen (@industriousowl), Lilly (@lillyhaekelfee), Sarah (@tinyhappyknits), Mia (@miamilanidesign), Keyneé (@kretear0), Kay (@kaydipitykrafts). Check out their Instagram accounts for their amazing crochet creations!
As always, I would love to see your finished projects using this pattern! Post photos of them in the comments below!
KOOPA SHELL PATTERN
YARN: green, blue or red (A), cream (B), black (C), white (D) [Worsted weight]
CROCHET HOOK: Size 7 (4.5 mm) [Recommended]
NOTIONS: Yarn needle, stitch marker, polyfill
ABBREVIATIONS:
ch: chain
sc: single crochet
hdc: half double crochet
inc: 2 single crochet into next stitch
dec: single crochet 2 stitches together
st: stitch
sl st: slip stitch
GAUGE: Not essential for project.
NOTE: Use a stitch marker to mark your rounds. Stuff firmly with polyfill during assembly.
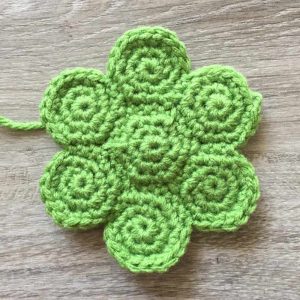
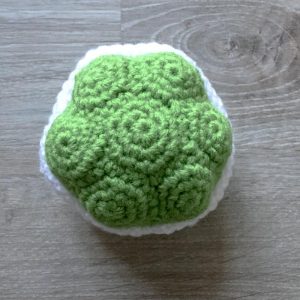
SHELL TOP PIECES (Make 7)
R1: With A, sc 6 in magic ring (6)
R2: inc in each st around (12)
R3: (sc 1, inc) six times (18)
Finish with a slip stitch. Leave long tail for sewing.
Lay out the pieces as shown. Using the yarn tails, sew the pieces together.

With A, pick up a stitch in a corner (where the red arrow is pointing).
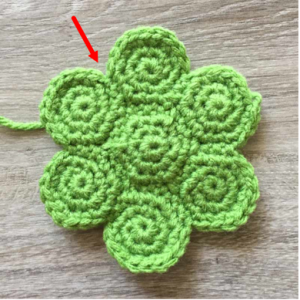
You will now be crocheting around the piece. The decrease stitches in R1 will be made in the corners as shown.

R1: (sc 8, dec) six times (54)
R2: (sc 16, dec) three times (51)
R3: (sc 15, dec) three times (48)
R4: Switch to B, sc in each st around (48)
R5: sc in each st around (48)
R6: (sc 14, dec) three times (45)
R7: (sc 13, dec) three times (42)
R8: (sc 5, dec) six times (36)
R9: (sc 4, dec) six times (30)
R10: (sc 3, dec) six times (24)
R11: (sc 2, dec) six times (18)
R12: (sc 1, dec) six times (12)
R13: dec six times (6)
Finish with a slip stitch. Cut a short tail and weave in.
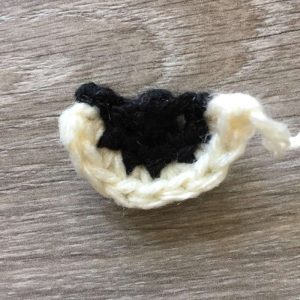
ARM OPENING (Make 2)
You start with a magic ring but you will be working in rows.
R1: With C, sc 3 in magic ring, ch 1 and turn
R2: inc three times
Fasten off and cut yarn.
R3: With B, (sc 1, inc) three times
Fasten off and leave a long tail for sewing.
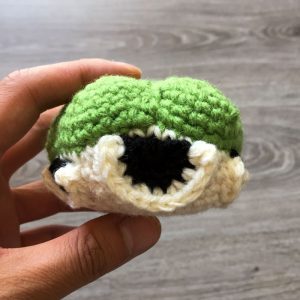
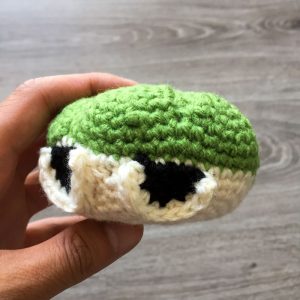
HEAD OPENING
This piece is done similar to the ARM OPENING.
R1: With C, sc 4 in magic ring, ch 1 and turn
R2: inc four times
Fasten off and cut yarn.
R3: With B, (sc 1, inc) four times
Fasten off and leave a long tail for sewing.
SHELL RIM
Depending on your personal tension, you can add/decrease the number of rows for the shell rim. You want to have the rim cover the circumference of the shell.
With D, chain 6. Join to first chain with a slip stitch to form a ring.
R1-50: sc in each st around (6)
Finish with a slip stich. Leave a long tail for sewing.
ASSEMBLY
Sew the HEAD OPENING to the front of the shell. Sew the ARM OPENINGS on the sides of the shell.
Sew the SHELL RIM along the edge where colour A and colour B meet.
SPIKES FOR BLUE KOOPA SHELL (Make 7) [OPTIONAL]
R1: With D, sc 6 in magic ring (6)
R2: (sc 1, inc) three times (9)
R3: sc in each st around (9)
Finish with a slip stitch. Leave long tail for sewing.

I can’t wait to make these! And then throw them at my husband =D
Thank you so much for making these so awesome!
I’ve been dying to find this pattern after seeing the work on DeviantArt. I’m so glad that I finally looked it up (while working on another project). I can’t wait to start these and throw them at my daughters!
Thank you so much for sharing! 🙂
You’re very welcome!
Glad to see I’m not the only one thinking this way about their hubby. I. Thinking Te would be of use when following the US elections.
I was wondering when do you start stuffing the shell? I didn’t see that in your instructions, though it is possible I missed it.
Hello, you can stuff the shell anytime before the opening at the bottom closes up too much. You can do it before you crochet R13.
Hello! I have all parts finished, no issue; I’m working on the shell rim now though and I’m just not quite understanding how this is supposed to work? It’s just making a large closed circle. How is this supposed to go over or around the shell? What am I doing wrong? I just don’t understand the steps for the rim.
Hi!, I love your pattern. I was wondering if you stuffed the shell rim, I’m not sure if I’m supposed to.
You don’t need to stuff the rim.
Hi,
I am new to crocheting and wondering if someone could help advise me how to sew the pieces on together ?
thanks
Chelsea