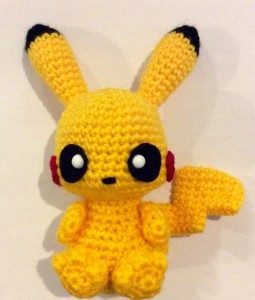
Are you having trouble catching yourself a Pikachu in the wild? Grab a hook and some yarn and crochet your own with this free Pikachu crochet pattern! Make sure you check out my other patterns as well for my other Pokemon crochet designs!
Materials:
yellow (A), black (B), red (C), brown (D) worsted weight yarn
8 mm safety eyes
polyester fibrefill
black felt
size 7 (4.5 mm) crochet hook
yarn needle
Abbreviations:
ch = chain
st = stitch
sc = single crochet
inc = single crochet 2 into the same stitch
inc3 = single crochet 3 into the same stitch
dec = decrease over next two stitches (single crochet 2 stitches together or use invisible decrease)
puff st = [yarn over, insert hook into st, yarn over, pull yarn through st, yarn over, draw through 2 loops] twice into the same st, yarn over, pull yarn through all three loops on hook
HEAD
R1: With A, sc 6 into magic ring (6)
R2: inc in each st around (12)
R3: (sc 1, inc) six times (18)
R4: (sc 2, inc) six times (24)
R5: (sc 3, inc) six times (30)
R6: (sc 4, inc) six times (36)
R7-13: sc in each st around (36)
R14: sc 16, inc, sc 2, inc, sc 16 (38)
R15: sc 17, dec, dec, sc 17 (36)
R16: (sc 4, dec) six times (30)
R17: (sc 3, dec) six times (24)
R18: (sc 2, dec) six times (18)
R19: (sc 1, dec) six times (12)
Finish with a sl st. Leave long tail for sewing.
EARS (Make 2)
R1: With B, sc 6 into magic ring (6)
R2: (sc 1, inc) three times (9)
R3: (sc 2, inc) three times (12)
R4: (sc 3, inc) three times (15)
R5: sc in each st around (15)
R6: Switch to A, sc in each st around (15)
R7: sc 13, dec (14)
R8: sc in each st around (14)
R9: (sc 5, dec) two times (12)
R10: sc in each st around (12)
R11: (sc 4, dec) two times (10)
R12: sc in each st around (10)
R13: (sc 3, dec) two times (8)
R14: sc in each st around (8)
Finish with a sl st. Leave long tail for sewing.
CHEEKS (Make 2)
R1: With C, sc 8 in magic ring (8)
Finish with a sl st. Leave 6″ tail for sewing.
BODY
R1: With A, sc 6 into magic ring (6)
R2: (sc, inc3, inc3) two times (14)
R3: sc 3, inc3, inc3, sc 5, inc3, inc3 sc 2 (22)
R4: sc 4, inc, inc, inc, sc 8, inc, inc, inc, sc 4 (28)
R5-9: sc in each st around (28)
R10: (sc 5, dec) four times (24)
R11: sc in each st around (24)
R12: (sc 4, dec) four times (20)
R13: sc in each st around (20)
R14: (sc 8, dec) two times (18)
Finish with a sl st. Leave a short tail and weave in.
ARMS (Make 2)
R1: sc 6 into magic ring (6)
R2: (sc 1, inc) three times (9)
R3: sc in each st around (9)
R4: sc 3, dec, sc 4 (8)
R5: (sc 2, dec) two times (6)
Finish with a sl st. Leave long tail for sewing.
FEET (Make 2)
R1: sc 6 into magic ring (6)
R2: inc in each st around (12)
R3: sc 3, (puff st, sl) three times, sc 3 (12)
R4: sc in each st around (12)
Finish with a sl st. Leave 8″ tail for sewing.
BACK STRIPES (Make 2)
With D, ch 6.
R1: Skip first ch on hook, sc 5, turn to work on the other side of the chain, sl st 5
Finish with a sl st. Leave long tail for sewing.
TAIL
With A, ch 9.
R1: Skip first ch from hook, sc 8, turn to work on the other side of the chain, sc 8 (16)
R2 – 5: sc in each st around (16)
Ch 8.
R6: sc 4, skip 8 st, sc 4, sc 8 st on chain (16)
R7: sc in each st around (16)
R8: sc 12, ch 6
R9: sc 3, sk 10 st, sc 6 st on chain (12)
R10: sc in each st around (12)
R11: sc 6, switch to D, sc 3, ch 4
R12: sc 3, skip 6 st, sc 3, sc 4 st on chain (10)
R13: sc 8
Finish with a sl st. Leave 8″ tail for sewing to body. Use yellow yarn to whip stitch the open gaps in the tail closed.
ASSEMBLY
Embroider the nose using black yarn as pictured.
Cut circles out of black felt, insert the safety eyes through the felt and fasten to the head as pictured.
Sew the cheeks and the ears to the head.

Use the yarn tail from the head to sew the body to the head.
Sew the arms onto the body.
Sew the feet onto the body.
Sew the back stripes and tail to the body as pictured.

There you go! Enjoy your crochet Pikachu!
Please comment below if you have any questions or post links to your finished projects!


Hi! I’ve been working on this project for a bit now and I have really liked the results, but I’ve run into a bit of a problem with the tail. I’m a bit confused as to what I need to do exactly on rows 1 and 6. For row 1 I’ve been working around in a circular patern, but it seems to circle up a lot and I’m not sure if that’s the intended results. I’m not sure if this is throwing me off at row 6, but I’m also stuck there. Sorry if this is simple, but this is one of my first projects and I would really appreciate the help. Thanks!
Hi James, it is totally correct that it should be circling up and that you’re working in the round. After row 6, you make a chain to extend the tail and offset the round so that you get the zig zag shape of Pikachu’s tail.
I hope that helps!
Hi Sirpurlgrey,
I have been a little confused by the tail pattern when I get to rows 6, 9, etc.
When I create my chain(s) am I supposed to then SC into the chain or do I SC into the main portion of the tail before coming around to SC on into the tail?
Lastly, once the tail is complete and I whip stitch the holes with yellow yarn do I flip it inside out or keep it as is?
Thank you for your help!
Hi Greg,
After you create the chain, you will then SC into the main portion of the tail.
When you’re finished crocheting the tail, leave it as is and then use the yarn tail to stitch the gaps together.
Hope that helps!
Hello, i totally love this pikachu, but i cant get the tail right. Cant you post a video on how you do the tail?