I get really anxious when I’m asked about what I want for Christmas. As I’ve gotten older, I don’t feel like I want a lot of things anymore. If I need anything I’m able to purchase it myself. That’s why I always appreciate gifts that someone has taken the time to make or found something that’s one of a kind.
Inversely, I often struggle knowing what to get people. This year, I made Christmas ornaments to give as gifts to friends and coworkers and it just feels that much more personal.
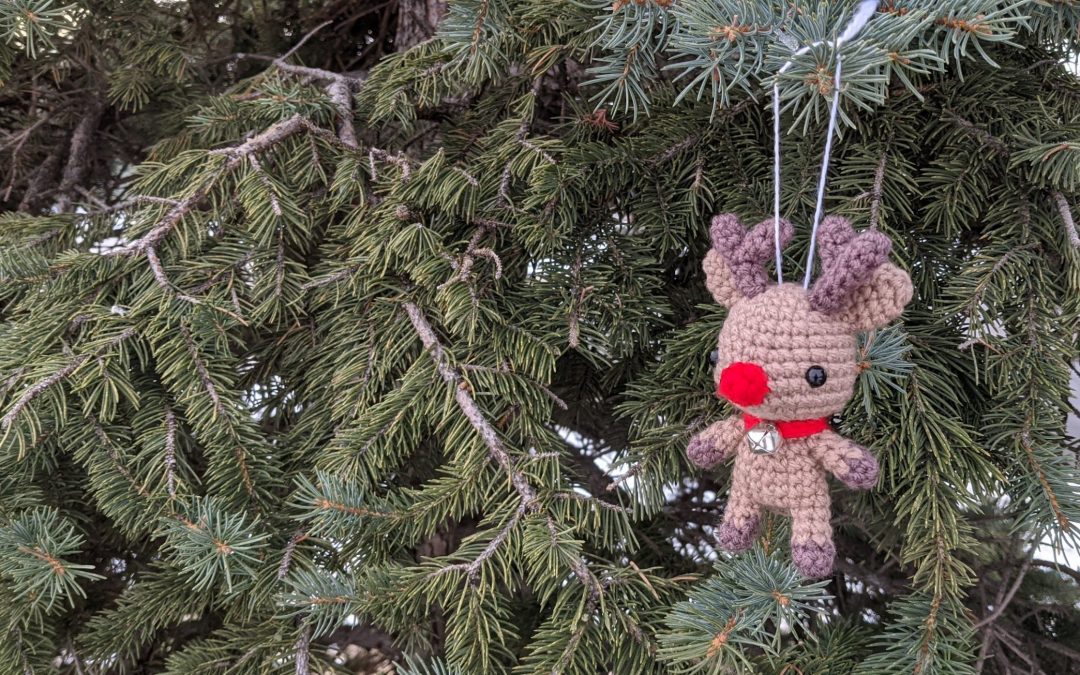
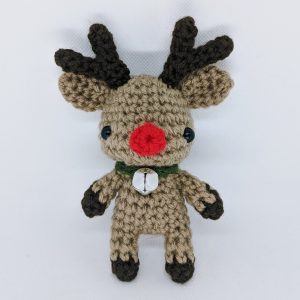
I made many a reindeer the last couple of weeks to giveaway for people to adorn their Christmas trees with. If you’ve got someone in your life that you still need to find a gift for, why not craft them a little reindeer ornament imbued with lots of love and care?
Along with the written pattern below, I’ve made a video tutorial to help you crochet the reindeer. Check it out on my YouTube channel HERE or watch below.
MATERIALS
Yarns – brown (B), dark brown (D), red (R), green (G)
white glue
polyester fibrefill
small bell
8.0 mm safety eyes
size 8 (5.0 mm) crochet hook
ABBREVIATIONS
ch = chain
st = stitch
sc = single crochet
hdc = half double crochet
sl st = slip stitch
inc = single crochet 2 into the same stitch
dec = decrease over next two stitches (single crochet 2 stitches together or use invisible decrease)
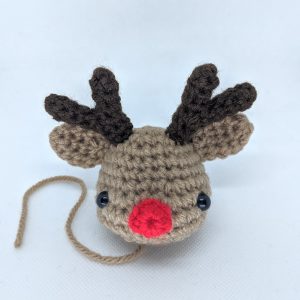
HEAD
R1 With B, sc 6 in magic ring (6)
R2 inc in each st around (12)
R3 (sc 1 , inc) six times (18)
R4 (sc 2, inc) six times (24)
R5-6 sc in each st around (24)
R7 sc 11, inc, inc, sc 11 (26)
R8 sc 12, inc, inc, sc 12 (28)
R9 sc 13, inc, inc, sc 13 (30)
R10 sc 13, dec, dec, sc 13 (28)
R11 sc 10, dec, dec, dec, dec, sc 10 (24)
R12 (sc 2, dec) six times (18)
R13 (sc 1, dec) six times (12)
Finish with a sl st. Cut a long tail for sewing. Insert safety eyes 8 rows from top of the head.
NOSE
R1 With R, sc 6 in magic ring (6)
R2 sc in each st around (6)
Finish with a sl st. Leave long tail for sewing.
EAR (Make 2)
R1 With B, sc 6 in magic ring (6)
R2 (sc 1, inc) three times (9)
R3 sc in each st around (9)
R4 sc 7, dec (8)
R5 (sc 2, dec) two times (6)
Finish with a sl st. Leave long tail for sewing.
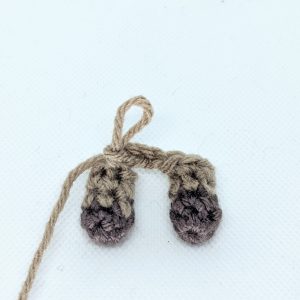
ANTLER (Make 2)
Main Beam
R1 With D, sc 5 in magic ring (5)
R2-6 sc in each st around (5)
Finish with a sl st. Leave long tail for sewing.
Fork
R1 With D, sc 5 in magic ring (5)
R2-3 sc in each st around (5)
Finish with a sl st. Leave long tail and sew at an angle to the main beam.
HEAD ASSEMBLY
Sew NOSE onto the HEAD.
Sew EARS to the sides of the HEAD.
Sew ANTLERS to the top of the HEAD.
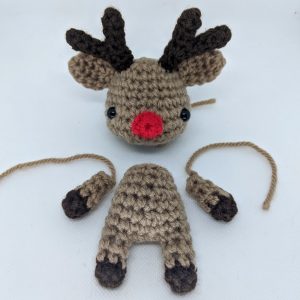
ARM (Make 2)
R1 With D, sc 6 in magic ring (6)
R2 sc in each st around (6)
R3 Switch to B, sc in each st around (6)
R4-5 sc in each st around (6)
Finish with a sl st. Leave long tail for sewing.
FIRST LEG
R1 With D, sc 6 in magic ring (6)
R2 sc in each st around (6)
R3 Switch to B, sc 6 in magic ring (6)
R4 sc in each st around (6)
Finish with a sl st. Leave long tail for sewing.
SECOND LEG AND BODY
R1 With D, sc 6 in magic ring (6)
R2 sc in each st around (6)
R3 Switch to B, sc 6 in magic ring (6)
R4 sc in each st around (6)
Chain 3.
R5 To join legs and form the body, sc 6 on the FIRST LEG, sc 3 on chain, sc 6 on SECOND LEG, sc 3 on chain (18)
R6 sc in each st around (18)
R7 (sc 7, dec) two times (16)
R8 sc in each st around (16)
R9 (sc 6, dec) two times (14)
R10 sc in each st around (14)
R11 (sc 5, dec) two times (12)
Finish with a sl st. Cut a short tail and weave in.
TAIL
R1 With B, sc 2, hdc 1, ch 1, hdc 1, sc 2 (6)
Finish with a sl st. Cut a long tail for sewing.
COLLAR
With C, chain 15.
Skip first ch, sl st 14
Fasten off. Cut a long tail for sewing.
ASSEMBLY
Sew HEAD to BODY.
Sew ARMS to BODY.
Sew TAIL to back of BODY.
Wrap COLLAR around neck and use the tail to sew the ends together. Sew a bell to the COLLAR.

Love him!!