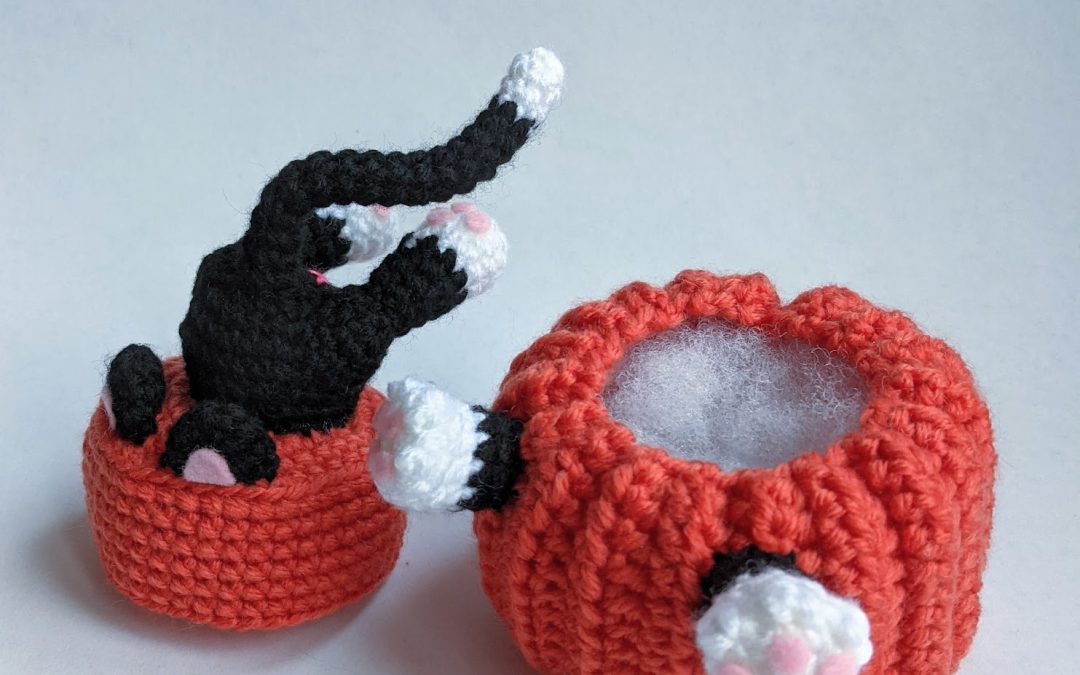
Welcome to Part 2 of my Pumpkin Diving Cat pattern! In Part 1 of this crochet along, we made the pumpkin and the inner base of the pumpkin that the cat pieces will be sewn onto.

In this second part of the pattern, you will be crocheting all the cat pieces (body, paws, tail) and completing the assembly of all the parts. You can add little toe beans to the paws with pink felt pieces made using a hole punch and gluing them to the bottom of the paws.
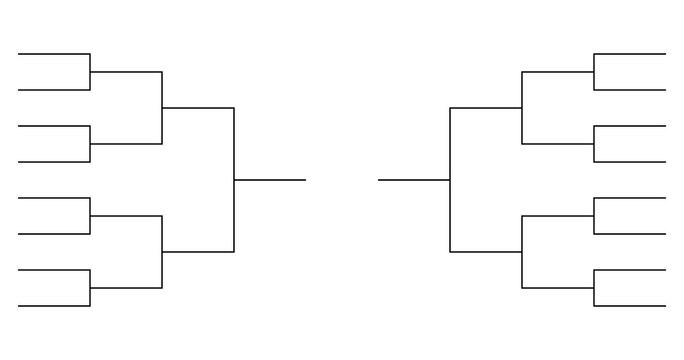
I am holding a contest for anyone who joins me on this crochet along for a chance to win a digital copy of my book, The Crochet Wildlife Guide, and two free patterns from my Etsy. To enter, all you need to take a great photo of your completed pumpkin diving cat and submit it by October 28, 2021 (11:30 MST). Creativity helps! Change up the colours, use a fluffy yarn, or give it a cute costume.
Here are the details:
Method 1 – If you have Instagram, share a photo of your pumpkin diving cat using the hashtag #pumpkindivingcatCAL and tagging @sirpurlgrey. Make sure your profile is public so that it can be viewed.
Method 2 – If you do not have Instagram, email a photo of your pumpkin diving cat to philliptyleha@gmail.com with your first name and any alt social media profiles (Twitter, TikTok, etc.).
Once I have all the submissions, I will be choosing the winner from a tournament bracket. For each head to head, I will post the photos to my Instagram Stories and let my audience vote for their favourite. The winners from each battle will move on to the next round until the final winner is chosen.
 I hope you enjoy making my pumpkin diving cat and best of luck in the contest!
MATERIALS/TOOLS
Yarns – orange (O), black (B), white (W), pink (P), green (G)
scissors
pink felt
polyester fibrefill
tacky (fabric) glue [I use glue from Aleene’s]
size 6 (4.0 mm) crochet hook [I use hooks from Laurel Hill]
yarn needle [I use the bent tip needles from Clover]
handheld hole punch [similar to this one from Amazon]
ABBREVIATIONS
ch = chain
st = stitch
sc = single crochet
hdc = half double crochet
sl st = slip stitch
inc = single crochet 2 into the same stitch
dec = decrease over next two stitches (single crochet 2 stitches together or use invisible decrease)
BLO = crochet into the back loops only
BODY
R1 With B, sc 6 in magic ring (6)
R2 inc in each st around (12)
R3 (sc 1, inc) six times (18)
R4 (sc 2, inc) six times (24)
R5 (sc 3, inc) six times (30)
R6 sc in each st around (30)
R7 (sc 3, dec) six times (24)
R8 sc in each st around (24)
Finish with a sl st. Cut a long yarn tail for sewing. Stuff the body with polyfill.
EAR (Make 2)
R1 With B, sc 6 in magic ring (6)
R2 (sc 2, inc) two times (8)
R3 (sc 3, inc) two times (10)
Finish with a sl st. Cut a long yarn tail for sewing. Cut two small triangles and glue to the front of each ear.
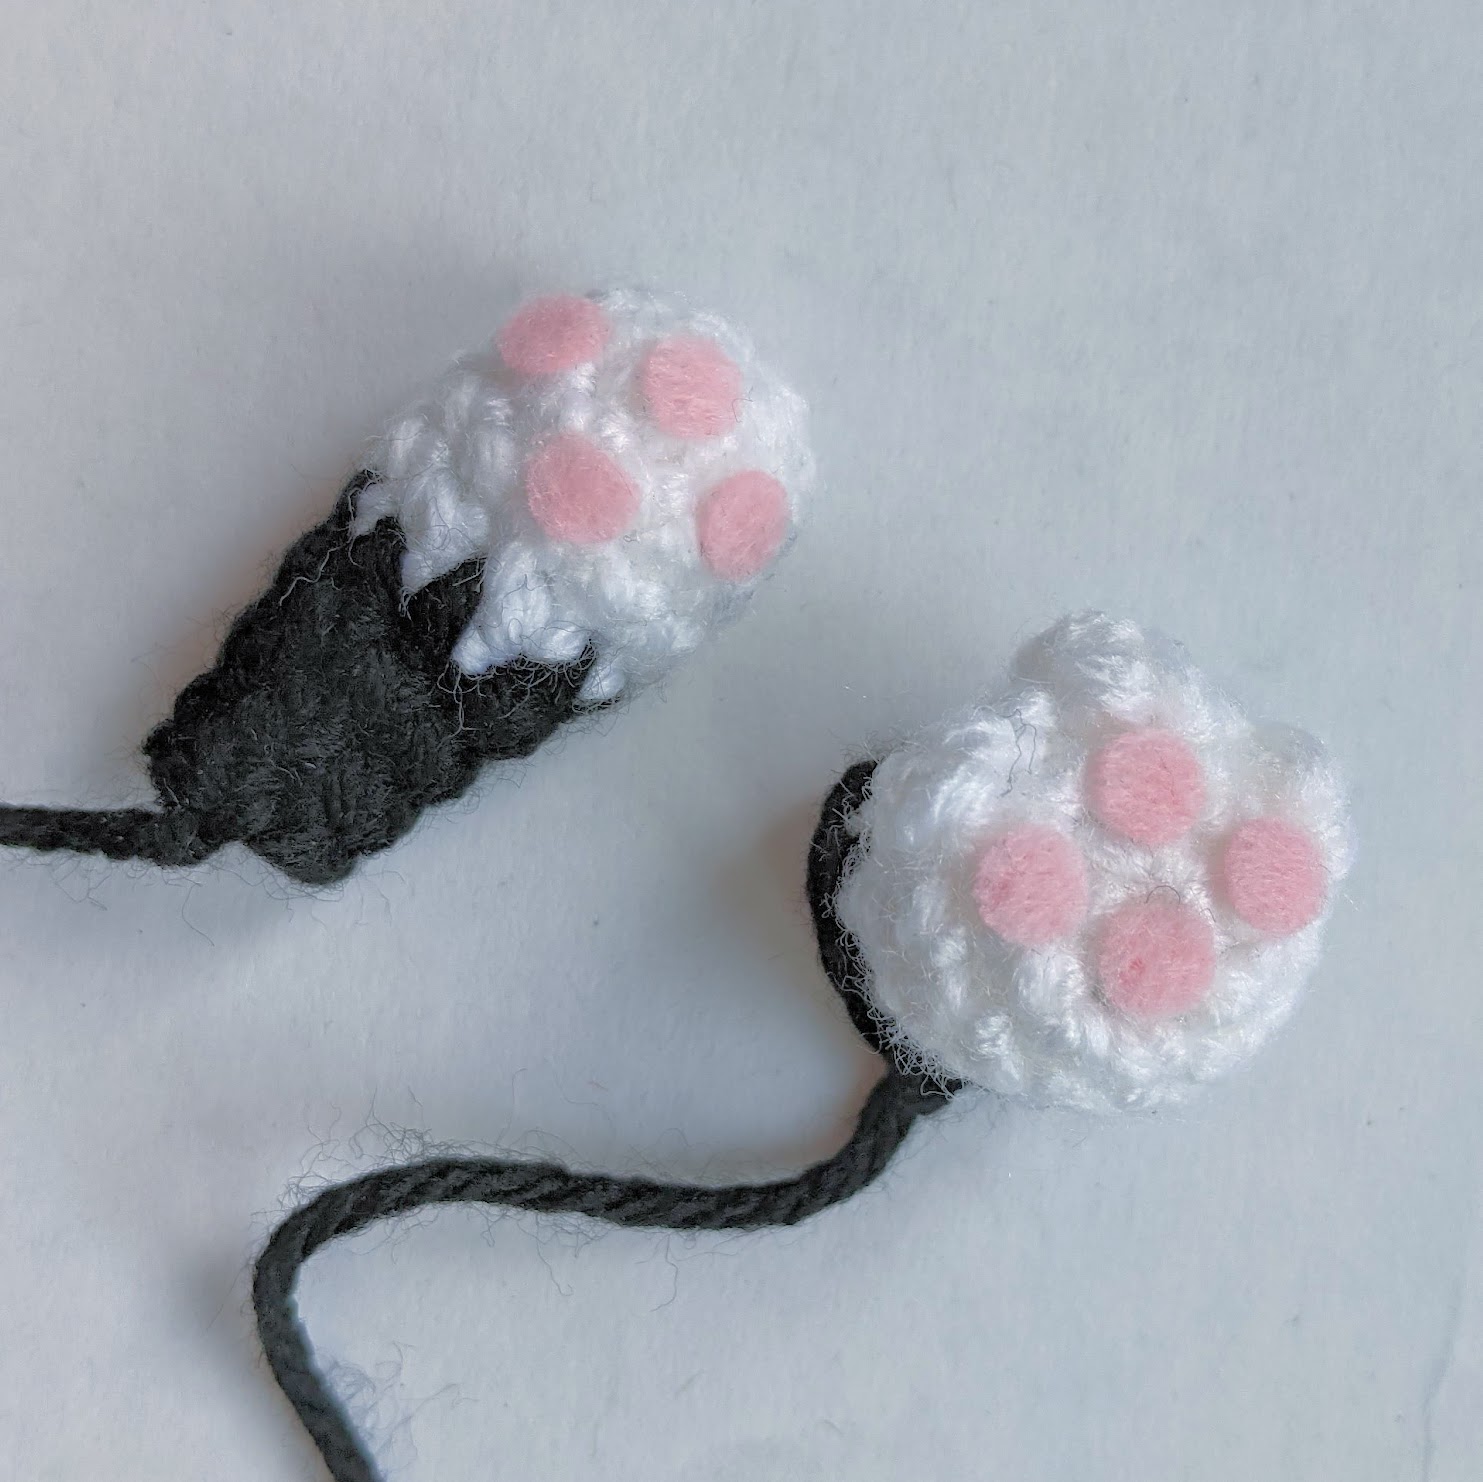
FRONT PAW (Make 2)
toe bean st – insert hook in stitch, yarn over and draw yarn through stitch, yarn over and insert hook into the same stitch and draw yarn through stitch (four loops on hook), yarn over and draw yarn through all loops on the hook
R1 With W, sc 6 in magic ring (6)
R2 inc in each st around (12)
R3 sc 3, (toe bean st, sc 1) three times, sc 3 (12)
R4 sc in each st around (12)
R5 (sc 4, dec) two times (10)
R6 With B, sc in each st around (10)
R7 (sc 3, dec) two times (8)
Finish with a sl st. Cut a long yarn tail for sewing. Stuff the front paw with polyfill.
THIGH (Make 2)
R1 With B, sc 6 in magic ring (6)
R2 inc in each st around (12)
R3 sc in each st around (12)
Finish with a sl st. Cut a long yarn tail for sewing.
HIND LEG (Make 2)
R1 With W, sc 6 in magic ring (6)
R2 inc in each st around (12)
R3-4 sc in each st around (12)
R5 (sc 4, dec) two times (10)
R6 With B, sc in each st around (10)
R7 (sc 3, dec) two times (8)
R8 sc in each st around (8)
R9 sc 6, dec (7)
Finish with a sl st. Cut a long yarn tail for sewing. Stuff the hind leg with polyfill.
ADDING TOE BEANS
Use a hole punch to punch out 16 circles from pink felt. Glue the circles to each front paw and hind leg as shown.
TAIL
R1 With W, sc 6 in magic ring (6)
R2-3 sc in each st around (6)
R4 With B, sc in each st around (6)
R5-12 sc in each st around (6)
Finish with a sl st. Cut along yarn tail for sewing.
ASSEMBLY
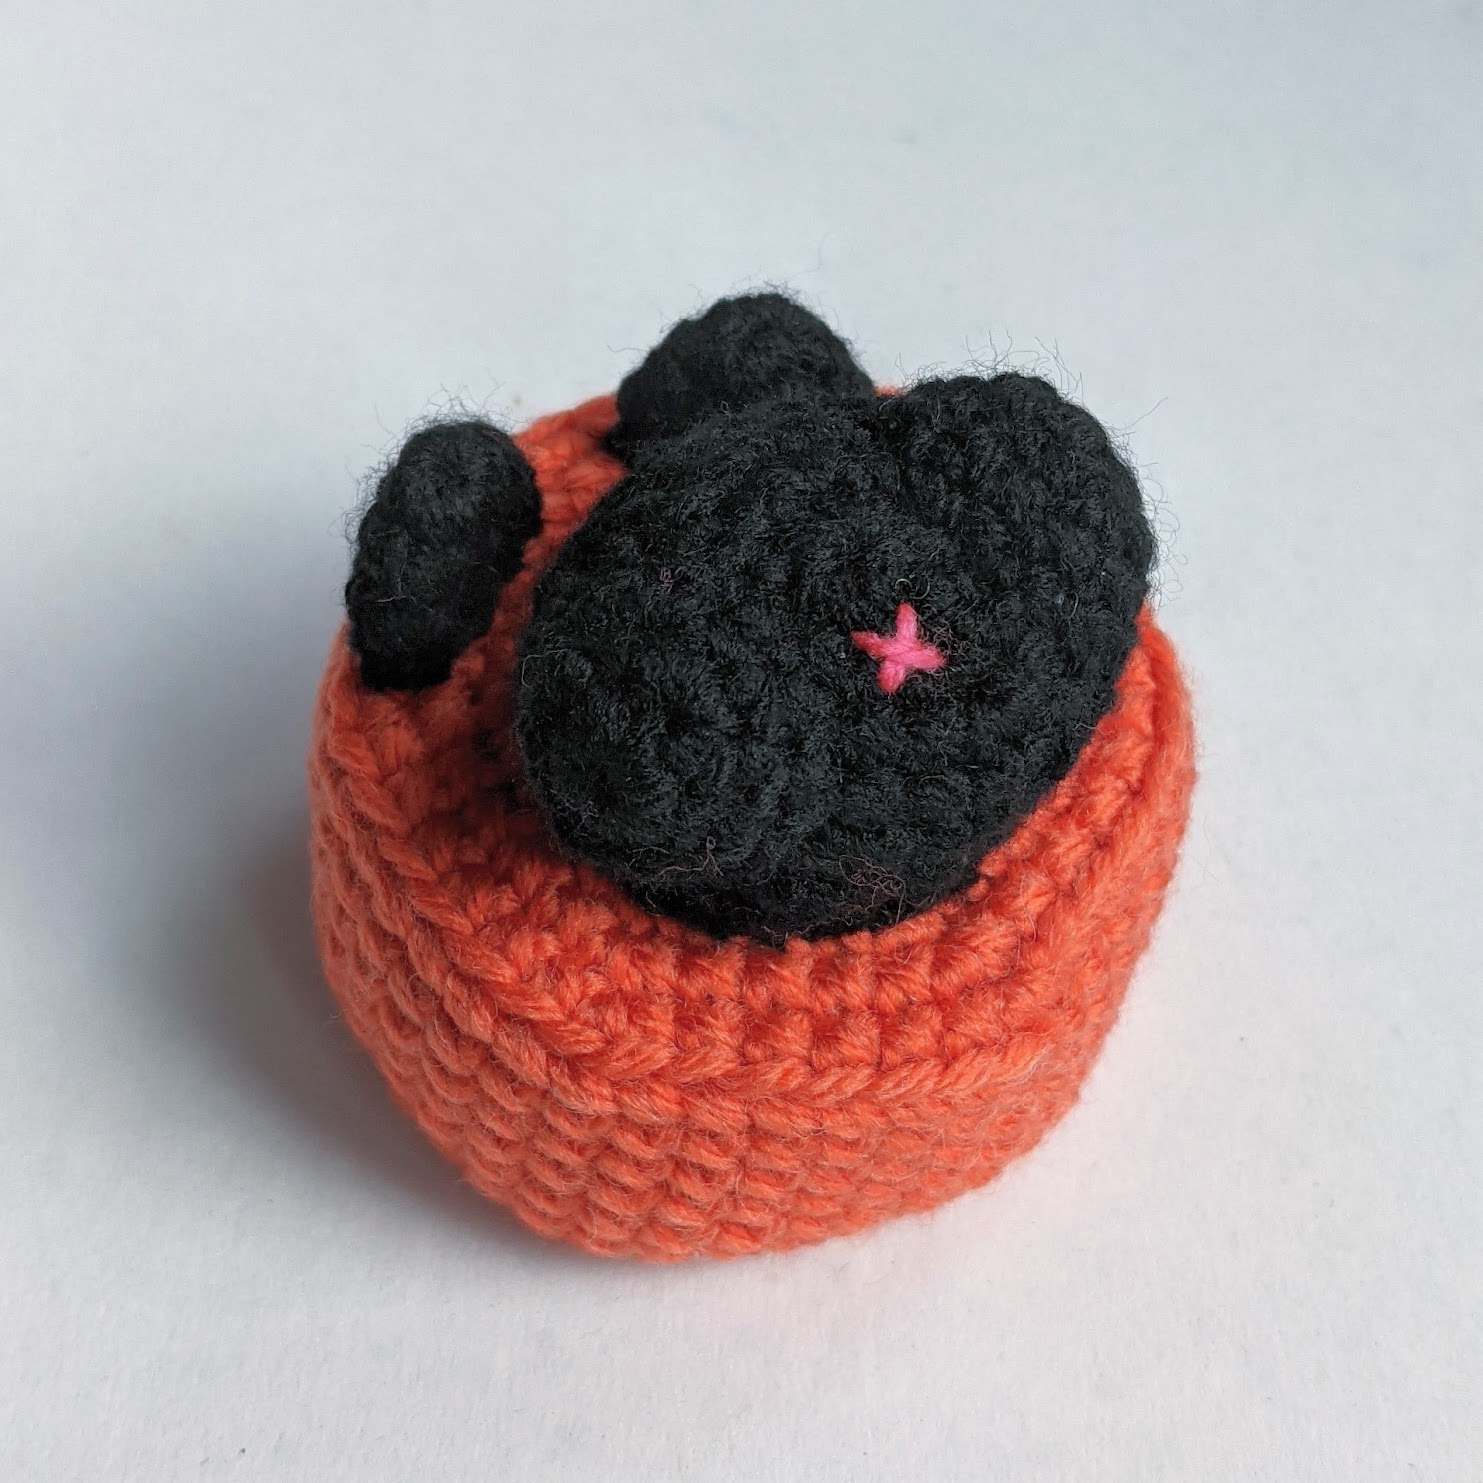
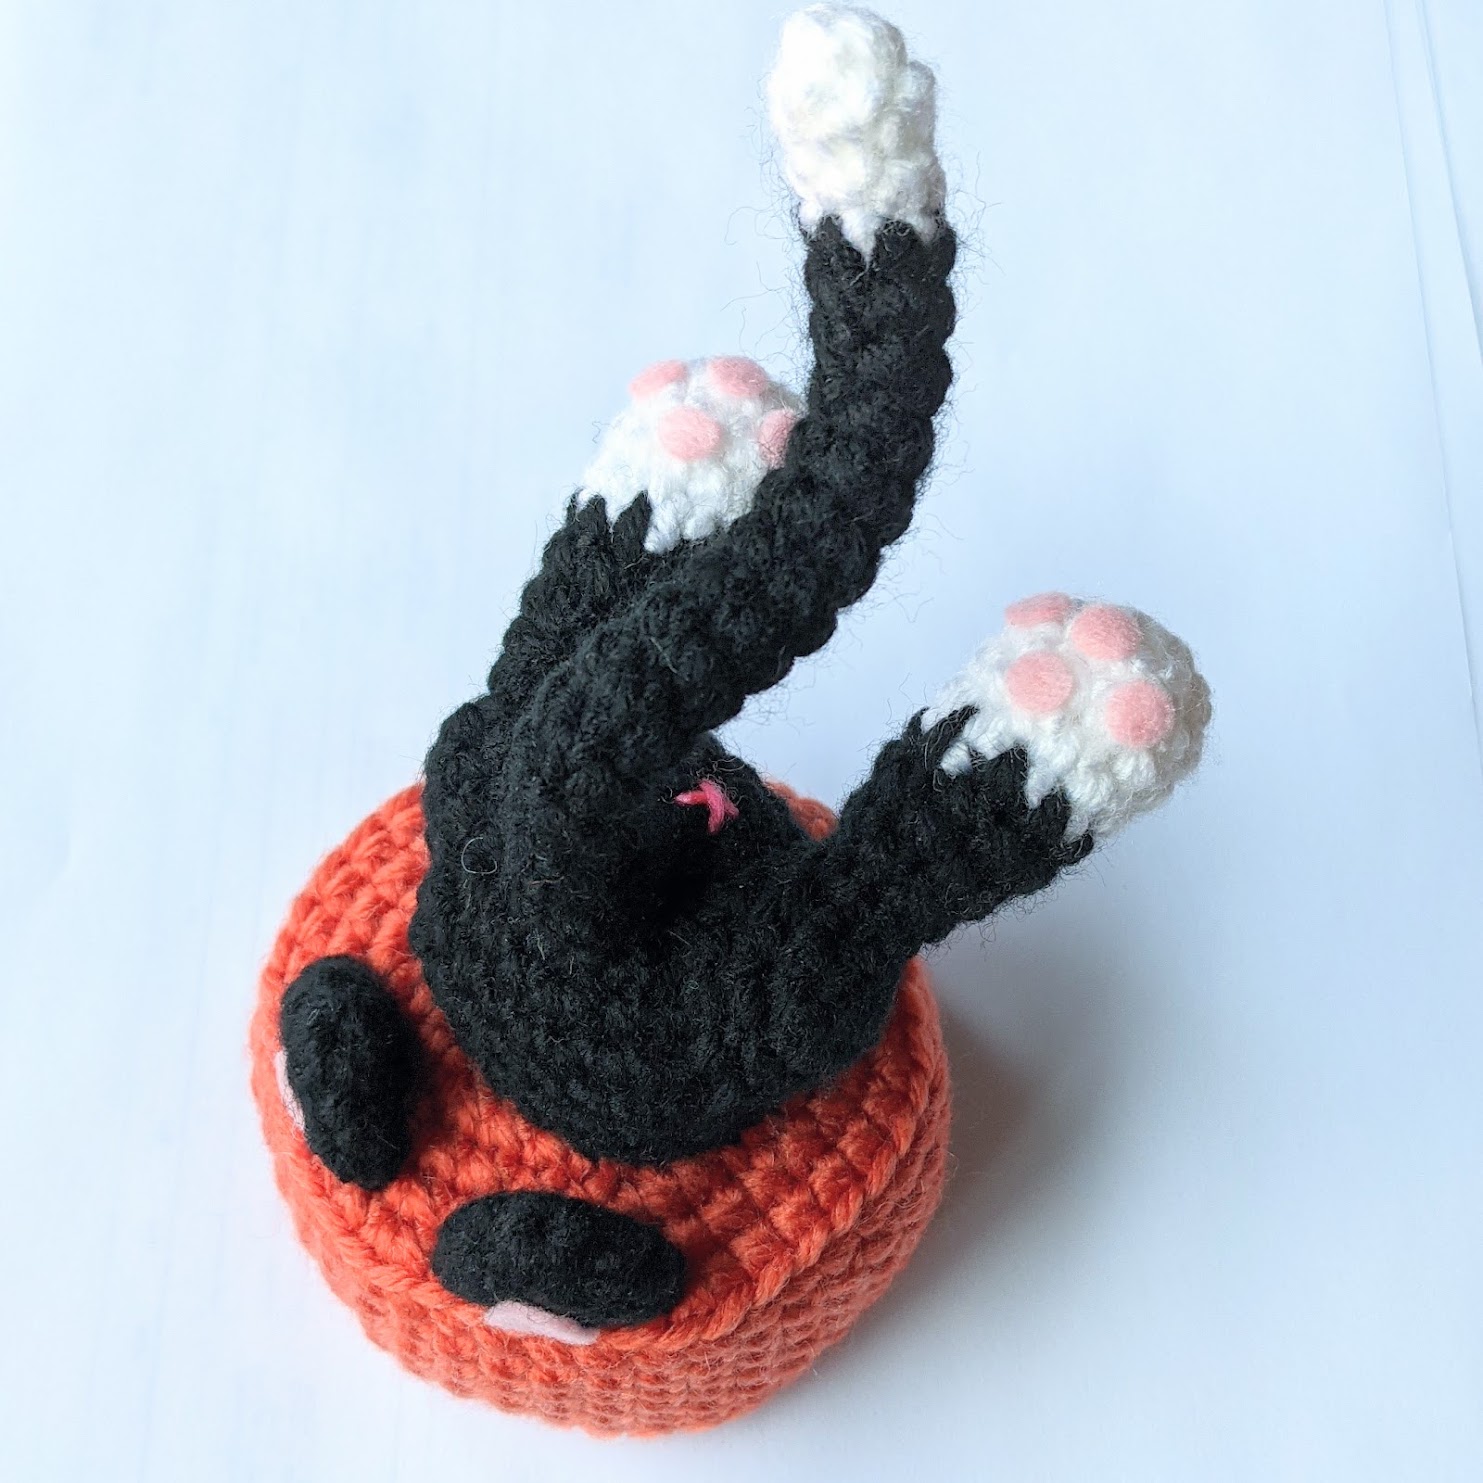
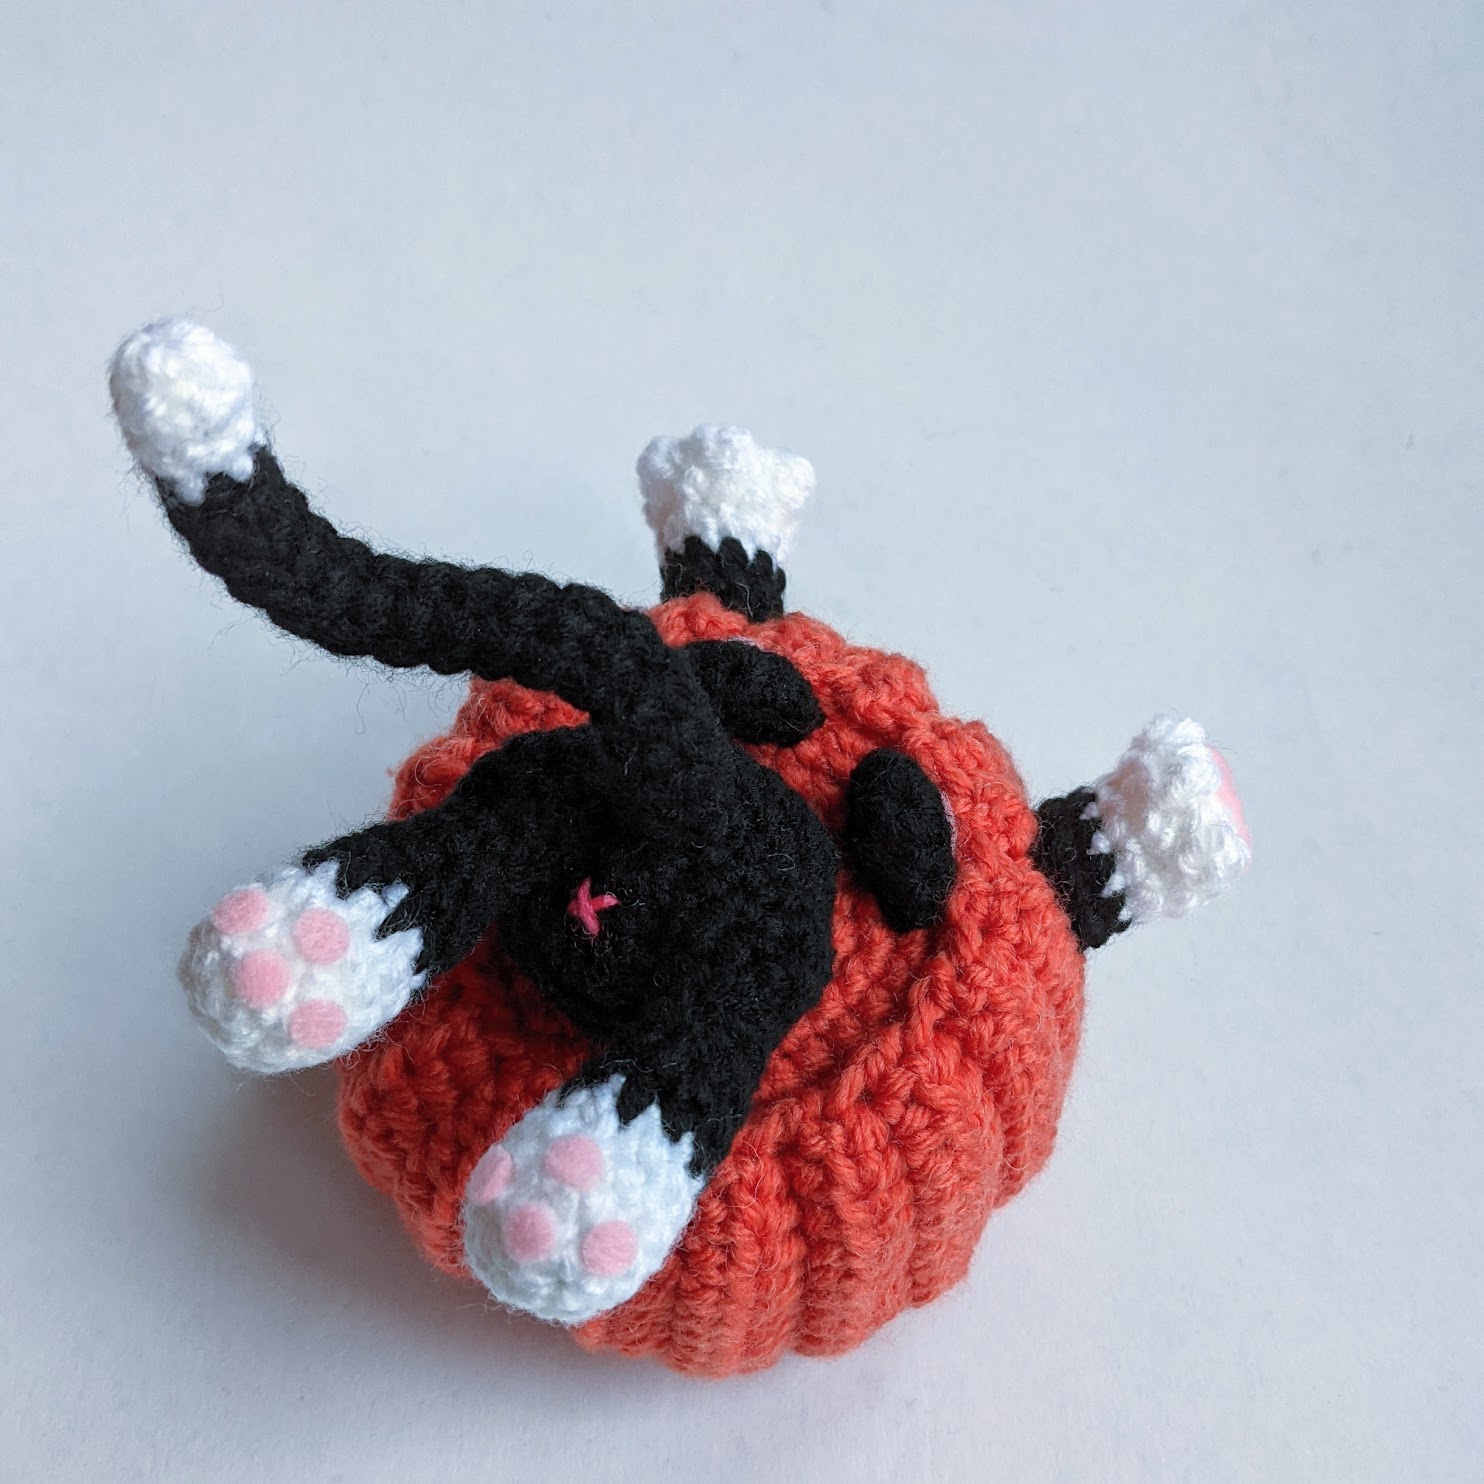
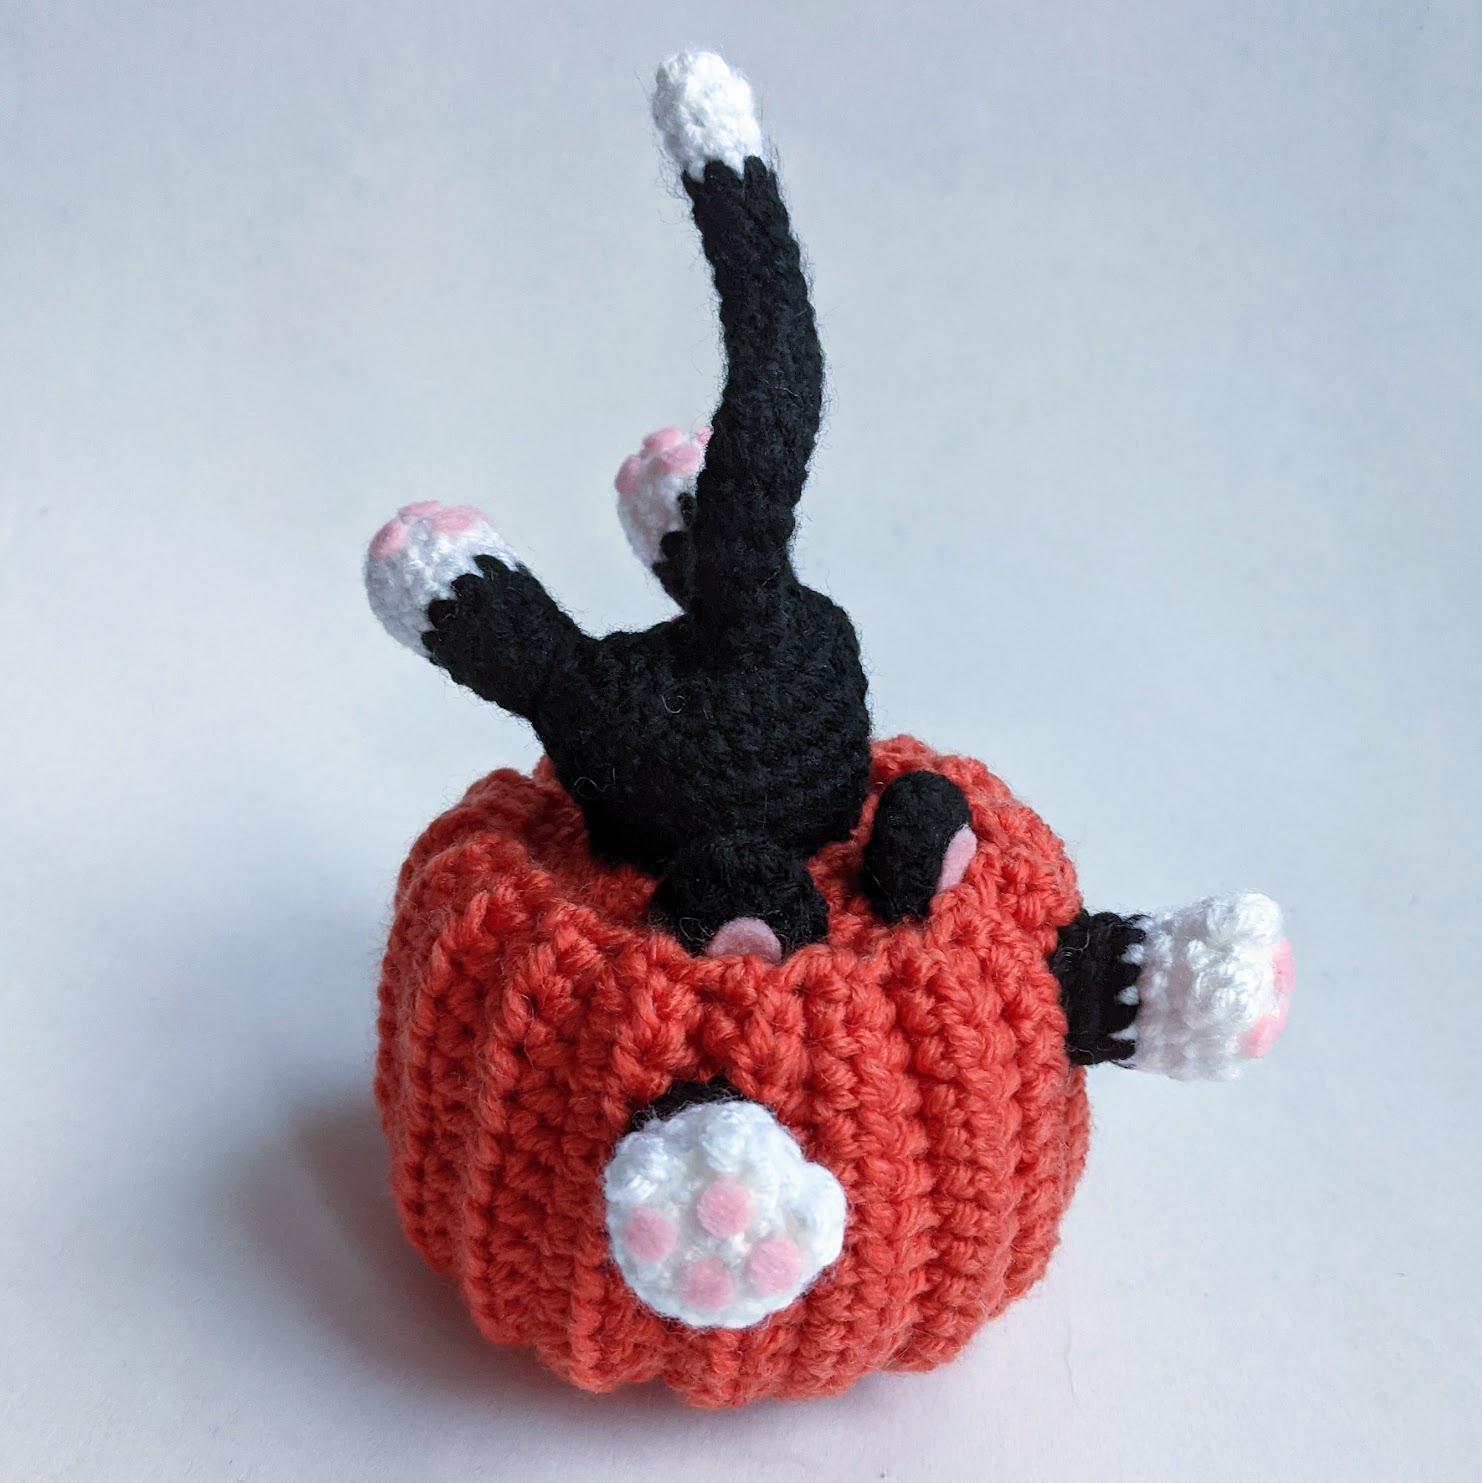
Sew the ears to the pumpkin base near the edge.
Sew the body to the pumpkin base behind the ears.
Sew the thighs to the body.
Cut a strand of pink yarn and embroider an “X” on the bum.
Position the hind legs as shown and sew the hind legs to the thighs.
Sew the tail above the “X” to the body.
Stuff the pumpkin with polyfill, leaving enough room for the pumpkin base to fit inside.
You can choose to sew the pumpkin base to the pumpkin or leave it unsewn in case you want the base to be removable.
Sew the front paws to the pumpkin in front of the ears.

Trackbacks/Pingbacks